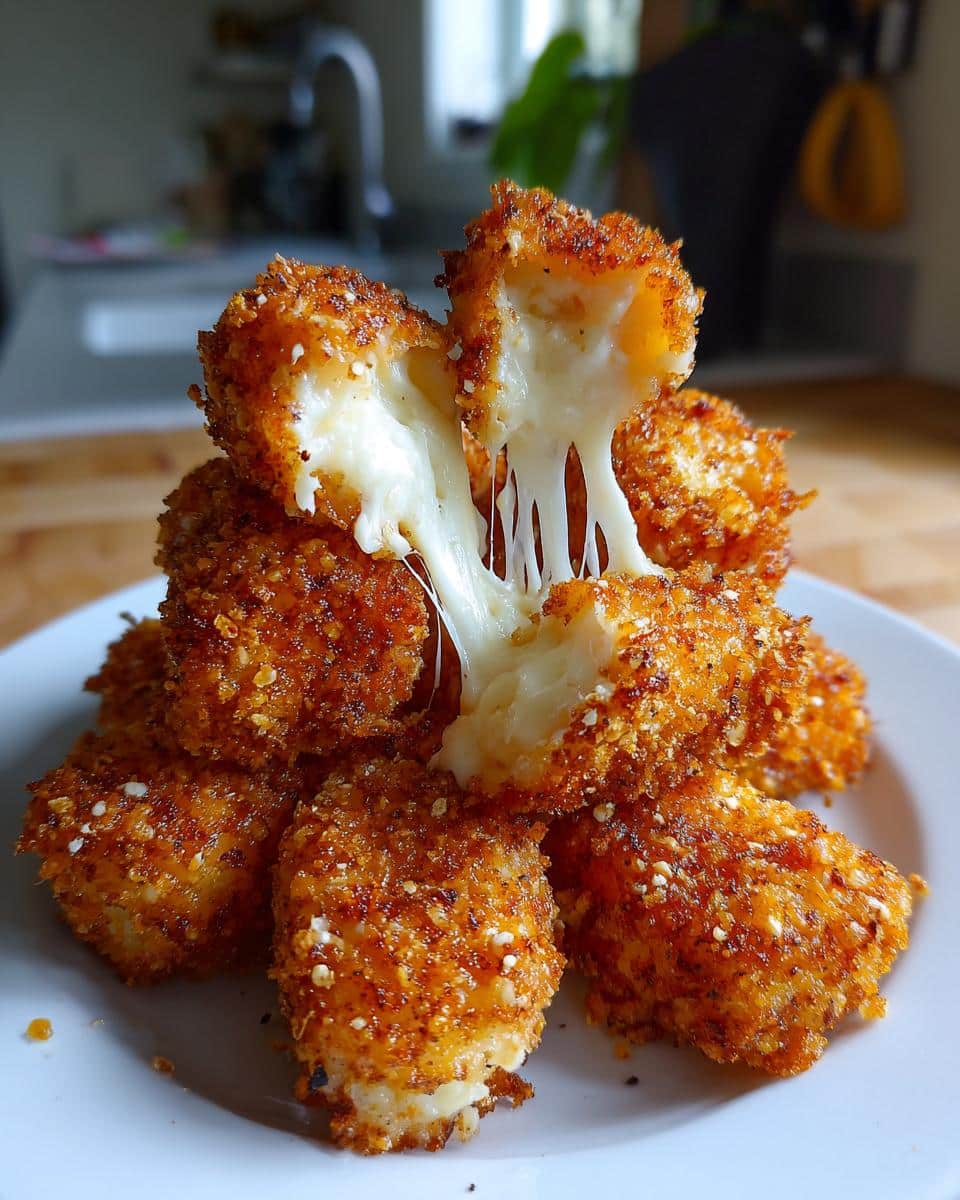
Unlock the Secrets to the Perfect Cheese Pull with Homemade Mozzarella Sticks
There are some snacks that just hit different after a long day – something warm, comforting, and undeniably fun to eat. For many, myself included, that ultimate craving fixer is a plate of glorious mozzarella sticks. You know the feeling: you open the fridge, nothing sparks joy, but then the thought of that crunchy exterior giving way to a molten, stretchy cheese pull floods your mind. While often considered a restaurant staple, the truth is, making homemade mozzarella sticks is not only totally doable but incredibly rewarding, and often, even better than takeout.
I used to think achieving that legendary cheese pull without the cheese bursting open during cooking was a secret held only by professional kitchens. But through a little trial and error, and picking up a few key tricks, I discovered it's entirely within reach for any home cook. If you've ever had a batch of homemade mozzarella sticks disappointingly burst open, leaving you with sad puddles of cheese instead of cheesy perfection, you're in exactly the right place. We're about to demystify the process and equip you with everything you need for that irresistible, Instagram-worthy cheese pull, every single time.
Why Homemade Mozzarella Sticks Trump Store-Bought Every Time
The timeless appeal of mozzarella sticks is undeniable. They check every box for comfort food: a satisfying crunch, a gooey, stretchy interior, and an inherent demand for a delicious dip. But beyond the universal appeal, there's a unique satisfaction in making them yourself.
The best part about going the homemade route is the unparalleled control you gain over every single element. Want them extra crispy? You've got the power. Need them to be gluten-free? Absolutely achievable with the right ingredients. Craving that nostalgic taste of your favorite late-night appetizer? You can get incredibly close, and often surpass it, because you're using fresh cheese and clean oil. No mysterious ingredients, no stale flavors – just pure, cheesy goodness crafted by your own hands.
Moreover, the journey of making them adds to the experience. It's a fun project, especially if you involve family or friends. The anticipation builds as you bread, freeze, and then finally cook them. And the resulting fresh taste and perfect texture are rewards that simply can't be replicated by a frozen box from the grocery store. It's not just a snack; it's an experience.
The Core Secrets to an Irresistible Cheese Pull (and No Blowouts!)
Before we dive into the step-by-step, let's address the fundamental principles that make the difference between a glorious, stretchy cheese pull and a disappointing, burst-open mess. These are the hard-learned lessons that will elevate your mozzarella sticks game significantly. The secret isn't fancy ingredients; it's about preparation, patience, and precision.
Choosing Your Cheese Wisely
The foundation of any great mozzarella stick is, naturally, the mozzarella itself. While many types of mozzarella exist, for sticks, you want specific characteristics:
- Low-Moisture Mozzarella: This is non-negotiable. High-moisture mozzarella (like the fresh kind packed in water) contains too much water, which will turn to steam during cooking, causing your sticks to burst and leak cheese. Low-moisture mozzarella holds its shape better and melts into that perfect gooey consistency without exploding.
- String Cheese: For ultimate convenience, string cheese is a fantastic choice. It's already portioned into stick shapes and freezes quickly. This makes it ideal for a spontaneous craving.
- Block Mozzarella: If using a block, ensure it's low-moisture, part-skim mozzarella. Cut it into thick, substantial sticks – think about the size of a standard string cheese. Avoid cutting them too thin, like skinny fries, as thinner pieces melt much faster, increasing the risk of premature bursting and cheese escape. A good size is about 3-4 inches long and 0.5-0.75 inches thick.
The Double-Coating Breading Station
This is where many home cooks skip a critical step, only to wonder why their cheese escapes. A robust, sealed coating is your cheese's fortress. The key is a double breading:
- First Dusting: Start with a coating of gluten-free flour or cornstarch. This dry layer creates a tacky surface for the egg to adhere to.
- First Egg Wash: Dip into beaten eggs, seasoned with a pinch of salt. The egg acts as a binder.
- First Crumb Coat: Roll thoroughly in breadcrumbs. Press the crumbs into the cheese with your hands, ensuring full coverage.
- Second Egg Wash: Dip into the egg wash *again*. This additional layer provides extra adhesion for the final crumb layer, strengthening the seal.
- Second Crumb Coat: Roll again in breadcrumbs, pressing firmly. This final, thick layer is crucial for both crispness and creating an impenetrable barrier.
For the breadcrumbs, you can use plain gluten-free breadcrumbs, or for an extra crispy texture, consider crushed gluten-free cornflakes or even panko breadcrumbs. Don't forget to season your breadcrumbs! A mix of garlic powder, onion powder, Italian seasoning, and black pepper will infuse amazing flavor into your crispy coating.
The Critical Freeze
This step is absolutely non-negotiable and perhaps the most important secret to preventing blowouts and ensuring that perfect cheese pull. After breading, the mozzarella sticks *must* be frozen solid. Why?
- Prevents Premature Melting: Freezing ensures the cheese is very cold when it hits the hot oil (or oven/air fryer). This gives the breading enough time to cook and crisp up before the cheese inside completely melts and expands, putting pressure on the coating.
- Sets the Coating: Freezing also helps the breading adhere firmly to the cheese, reducing the chance of it flaking off during cooking.
Lay your breaded sticks on a parchment-lined baking sheet and freeze them for at least 1 to 2 hours. Overnight is even better if you're planning ahead. The colder they are, the better your results will be.
Temperature Control is Key
Whether frying, baking, or air frying, maintaining the correct temperature is vital for crispiness without overcooking the cheese:
- For Frying: Heat your oil to precisely 350°F (175°C). If you don't have a thermometer, drop a tiny breadcrumb into the oil; it should sizzle immediately but not burn instantly. Fry in small batches to avoid dropping the oil temperature too much, which can lead to greasy, soggy sticks. Each side should cook for only about 45 seconds to 1 minute until golden brown. The longer they sit in the hot oil, the more likely they are to burst.
- For Baking/Air Frying: Preheat your oven or air fryer thoroughly. Cooking too slowly at a lower temperature gives the cheese more time to melt and escape. High heat and short cooking times are key.
Breading Station Breakdown: Ingredients & Setup
Setting up an efficient breading station is crucial for success and minimizing mess. Here’s a detailed look at what you’ll need and how to arrange it:
Ingredients:
- 12-16 pieces of low-moisture mozzarella (string cheese or cut from a block)
- ½ cup all-purpose flour or gluten-free flour (e.g., rice flour, cornstarch)
- 2 large eggs, beaten with a pinch of salt
- 1-1.5 cups breadcrumbs (gluten-free breadcrumbs, Panko for extra crunch, or crushed cornflakes)
- 1 teaspoon garlic powder
- ½ teaspoon onion powder
- ½ teaspoon Italian seasoning
- ¼ teaspoon black pepper
- Pinch of salt
Setup:
- Dish 1 (Dry): In a shallow dish, combine the flour or cornstarch.
- Dish 2 (Wet): In a second shallow dish, whisk the eggs with a pinch of salt until well combined.
- Dish 3 (Seasoned Crumbs): In a third shallow dish, combine the breadcrumbs with the garlic powder, onion powder, Italian seasoning, and black pepper. Mix well.
- Preparation: Have your cold mozzarella sticks ready on a plate next to the flour. Place a clean, parchment-lined baking sheet on the other side of your breading station to hold the finished sticks.
Working from dry to wet to dry helps keep your hands cleaner and ensures an even coating. Use one hand for the dry ingredients (flour, crumbs) and the other for the wet (egg) to avoid clumping.
Cooking Methods: Fry, Bake, or Air Fry?
While pan-frying offers that classic, deep-fried texture, you have options depending on your preference and equipment.
Pan Frying (The Classic Method)
This is often considered the gold standard for achieving that restaurant-style crisp and gooeyness.
- Oil: Choose a neutral oil with a high smoke point, like canola, vegetable, or peanut oil. Pour enough oil into a small, deep pot or cast-iron skillet to cover the mozzarella sticks completely – usually 2-3 inches.
- Heat: Heat the oil to 350°F (175°C). Use a deep-fry thermometer for accuracy.
- Frying: Carefully lower 2-4 frozen sticks into the hot oil using tongs. Do not overcrowd the pot, as this will lower the oil temperature. Fry for 45 seconds to 1 minute per side, or until deeply golden brown and crispy. They cook very fast!
- Drain: Remove the cooked sticks with tongs or a slotted spoon and place them on a wire rack set over paper towels to drain excess oil.
Oven Baking for a Lighter Touch
For those looking for a slightly healthier alternative without sacrificing too much crispness, baking is a viable option.
- Preheat: Preheat your oven to 400°F (200°C).
- Prepare: Arrange the frozen, breaded mozzarella sticks in a single layer on a parchment-lined baking sheet. For extra crispiness, lightly spray them with cooking oil.
- Bake: Bake for 8-12 minutes, flipping them halfway through, until they are golden brown and the cheese is just beginning to melt and become soft inside. Watch them carefully, as overbaking can lead to leaks.
Air Frying for Convenience
The air fryer is a fantastic tool for achieving a crispy exterior with minimal oil, making it another great option for homemade mozzarella sticks.
- Preheat: Preheat your air fryer to 375°F (190°C) for about 5 minutes.
- Prepare: Lightly spray the frozen, breaded sticks with cooking oil.
- Air Fry: Place the sticks in a single layer in the air fryer basket, ensuring they don't touch. You'll likely need to work in batches. Air fry for 6-10 minutes, shaking the basket gently or flipping them halfway through, until they are golden brown and hot and gooey inside.
Serving Suggestions & Perfect Pairings
No plate of mozzarella sticks is complete without the perfect dipping companion! Warm marinara sauce is the quintessential pairing, offering a tangy counterpoint to the rich cheese. But don't limit yourself – consider a creamy ranch dressing, a zesty garlic aioli, or even a sweet and tangy honey mustard for a different flavor profile.
These crispy, cheesy delights are the ultimate crowd-pleaser. Serve them for game day, as an appetizer for a party, a fun snack for family movie night, or simply whenever that craving for something warm and gooey strikes. The best part? They're always devoured quickly, so make sure to make enough!
Embrace the Homemade Magic of Mozzarella Sticks
Making homemade mozzarella sticks from scratch might have seemed intimidating at first, but with these comprehensive tips and tricks, you now possess the knowledge to create truly spectacular results. From choosing the right cheese and mastering the double-breading technique to understanding the critical role of freezing and precise temperature control, every step contributes to that ultimate goal: a perfectly crispy coating and an undeniable, stretchy cheese pull that will impress everyone. Say goodbye to store-bought and hello to your new favorite homemade snack!
If you're still troubleshooting common issues like your cheese bursting, delve deeper into preventing those mishaps with our guide on Stop Bursting Mozzarella Sticks: Perfect Homemade Results. And for a broader look at achieving that quintessential appetizer experience, check out Easy Restaurant-Style Mozzarella Sticks: Crispy & Cheesy.
